Demystifying Lead Abatement: Your Step-by-Step Guide to a Lead-Safe Home

Table of Contents
Introduction
Is your home truly safe from hidden dangers—especially the ones you can’t see, like lead?
If your house was built before 1978, there’s a strong chance it may contain lead-based paint. And while it might not seem like an urgent concern, the health risks of lead paint—particularly for children—are serious and long-lasting. Lead exposure has been linked to developmental delays, learning difficulties, and a host of chronic health issues.
So how do you know if your home is affected, and more importantly, what can you do about it? That’s where lead abatement comes in.
In this step-by-step guide, we’ll break down everything you need to know about making your home lead-safe. You’ll learn what to look for, how to navigate lead inspection and abatement, and what it really takes to protect your family from lead exposure. Whether you’re a homeowner, a landlord, or someone living in an older rental, understanding lead hazard reduction isn’t just smart—it’s essential.
We’ll demystify professional lead abatement, clarify the difference between lead paint stabilization and full removal, and help you choose the safest, most affordable lead abatement approach for your space.
Let’s take the guesswork out of safeguarding your home—because peace of mind starts with knowledge.
Understanding Lead Hazards in the Home
When was the last time you thought about what’s lurking beneath your walls or windowsills? If your home was built before the late 1970s, there’s a real chance that lead-based paint is still present—and quietly putting your family at risk.
Why Lead Is Still a Problem Today
Despite being banned in residential use decades ago, lead paint hazards continue to impact homes, especially older ones. Time, weather, and even minor renovations can disturb old layers of paint, releasing invisible particles of lead dust into your living space. The result? A toxic threat that can be inhaled or ingested—often without you even realizing it.

Children are especially vulnerable. According to health experts, even low levels of lead can affect a child’s development, behavior, and learning abilities. Pregnant women and pets are also at high risk.
Where Does Lead Lurk in Your Home?
You might be surprised at how many areas could be hiding lead. Common hotspots include:
- Peeling or chipping paint on walls, windows, and doors
- Painted surfaces that rub together, like window sashes
- Dust from renovation or repair work
- Soil around the home’s foundation (especially if exterior paint has deteriorated)
And it’s not just inside your house. Outdoor play areas, porches, and garages may also harbor contamination if they’ve been painted with lead-based paint in the past.
Recognizing High-Risk Homes and Situations
Wondering if your property is at risk? You’re not alone. Many homeowners aren’t sure whether they need lead abatement services or not. Here’s when you should take a closer look:
- Your home was built before 1978 – This is the EPA’s cut-off year for lead use in residential paint.
- You see cracked, peeling, or chalky paint – These are visual clues that lead may be present.
- You’re planning a renovation – Even minor projects can disturb lead paint, requiring lead-safe renovation protocols.
- You have young children – Their developing bodies absorb lead more easily, making childhood lead poisoning prevention an urgent priority.
The True Cost of Ignoring Lead
We get it—lead abatement can feel overwhelming. But the cost of doing nothing is far greater. From medical bills to long-term health impacts, the risks add up quickly. That’s why making your home lead-safe isn’t just a smart decision—it’s a necessary one.
In the next section, we’ll explore how to spot the signs of lead contamination and what you can do to confirm whether your home needs professional help.
Let’s keep moving—because every step you take brings you closer to peace of mind.
Recognizing the Signs of Lead Contamination
Not sure if your home is contaminated with lead? You’re not alone. Many homeowners live with the threat of lead paint hazards without even knowing it. The good news? Once you know what to look for, spotting the signs becomes much easier—and the path to a safer home much clearer.
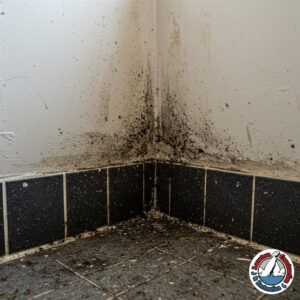
What Does Lead Contamination Look Like?
Lead doesn’t always wave a red flag, but there are some telltale signs that something’s not right. Here’s what should catch your attention:
- Cracked or peeling paint, especially around windows, doors, and baseboards
- Dust buildup on floors and window sills that reappears even after cleaning
- Discolored or chalky paint that rubs off to the touch
- Old, neglected renovations that may have disturbed lead-painted surfaces
Keep in mind: lead dust removal becomes a serious concern during any disturbance—like sanding, scraping, or remodeling.
DIY Test Kits vs. Professional Lead Inspection
Curious if there’s lead in your home? You have two options: at-home test kits or certified professional inspections. Let’s break it down:
DIY Lead Test Kits
These are available at most hardware stores and are simple to use. They’re best for:
- Quick spot-checks on painted surfaces
- Getting a rough idea of potential contamination
- Temporary reassurance during minor repairs
But be warned: these tests can be limited in accuracy and scope. They often don’t detect lead dust, which is one of the most dangerous forms of contamination.
Professional Lead Inspection and Abatement
Hiring a certified professional ensures your entire home is thoroughly evaluated using industry-grade tools. You’ll receive:
- A detailed report identifying lead paint hazards
- Lab-tested results for paint, dust, and soil
- Guidance on lead hazard reduction or full lead abatement services
This is the safer, more comprehensive route—especially if children or pregnant women live in the home.
When Should You Schedule a Lead Inspection?
If you’re asking the question, the answer might be now. Here’s when to act:
- Before buying or renting an older property (especially those built before 1978)
- Before starting a renovation or DIY project
- If anyone in your household has elevated blood lead levels
- If you’ve noticed any of the signs listed above
Choosing certified lead abatement professionals ensures your inspection meets EPA lead abatement regulations and that any future mitigation steps are safe and legally compliant.
Recognizing lead contamination is the first real step toward protecting your home and health. Up next, we’ll explore the differences between temporary fixes and permanent solutions—so you can decide what’s right for your space.
Lead Abatement vs. Lead Control: What’s the Difference?
If you’ve discovered lead in your home, your next question is probably: What do I do about it?
It’s a fair—and important—question. But before jumping into action, it’s essential to understand the difference between lead abatement and lead control. These aren’t interchangeable terms, and choosing the right path could make all the difference for your family’s long-term safety and your home’s compliance.

What Is Lead Abatement?
Lead abatement is a permanent solution. It’s the process of completely removing or sealing off lead-based hazards under strict safety guidelines. This isn’t your average DIY job—it involves licensed professionals following EPA lead abatement regulations and, in many cases, HUD lead abatement guidelines.
Lead abatement may involve:
- Lead-based paint removal using safe, approved methods
- Lead paint encapsulation (sealing lead paint beneath a durable coating)
- Lead paint containment or enclosure (covering surfaces with non-leaded materials)
- Replacement of contaminated building components, like windows or trim
This is your go-to option if you’re dealing with high lead levels, preparing a property for child occupancy, or required to comply with government mandates (especially in rentals, schools, or commercial buildings).
What Is Lead Control?
Lead control—also called interim controls or lead hazard reduction—is a temporary solution. It reduces the risk of exposure but doesn’t eliminate the hazard itself. While it can be more affordable in the short term, it’s not a substitute for abatement when long-term safety is the goal.
Lead control methods include:
- Specialized cleaning to remove lead dust
- Paint stabilization on deteriorated surfaces
- Repairs to damaged components that generate dust or chips
- Education on safe cleaning and maintenance practices
Lead control may be right for you if you’re on a tight budget or planning renovations in phases—but remember, it requires ongoing monitoring.
Which Option Is Right for You?
Here are some key considerations:
- Is the property residential or commercial?
- Older commercial buildings and schools often require abatement to meet compliance.
- Are children or pregnant women living in the home?
- Lead abatement is strongly recommended to reduce serious health risks.
- What’s your budget and timeline?
- Lead control can serve as a short-term fix, but affordable lead abatement programs may help fund permanent solutions.
- Do you plan to remodel or sell?
- Buyers and renters increasingly demand lead-safe home practices and documentation of completed lead remediation.
At the end of the day, knowing the difference between lead abatement and lead control empowers you to make informed, confident decisions. In the next section, we’ll walk through how to prepare your home—and your family—for the abatement process, step by step.
Preparing Your Home and Family for Abatement
So, you’ve decided to move forward with lead abatement—great choice. But before the professionals arrive, it’s important to take a few thoughtful steps to ensure everything goes smoothly. Proper preparation protects your family, your property, and helps your lead abatement project stay on schedule and within budget.
Why Preparation Matters
Think of lead abatement as a high-stakes renovation. You’re not just updating a room—you’re removing a health hazard. That means special safety protocols, temporary changes to your living situation, and clear communication with your contractor are essential.
Neglecting this phase can result in delays, contamination, or even non-compliance with EPA lead abatement regulations. Preparation helps everyone involved—especially you—breathe a little easier.
Step 1: Choose the Right Professionals
Not all contractors are created equal. To ensure your home is treated with care and your family is protected, look for:
- Certified lead abatement contractors who meet state and federal requirements
- Proof of licensed lead abatement credentials
- Experience with residential lead abatement (especially in homes similar to yours)
- Positive reviews or references from past clients
Avoid general handymen or uncertified providers. Only certified pros know how to follow lead-safe renovation practices and safely handle hazardous materials.
Step 2: Plan for Temporary Relocation (If Necessary)
Depending on the size and scope of the work, you may need to leave your home for a few days. Consider temporary relocation if:
- The work area includes bedrooms, kitchens, or high-traffic zones
- Children, pregnant women, or pets are present
- The project involves full lead paint removal or large-scale lead dust generation
Even if you’re not required to leave, it’s often less stressful (and safer) to stay elsewhere while the work is in progress.
Step 3: Secure the Space Before Work Begins
Help your contractor by preparing the space ahead of time. Here’s what you can do:
- Remove furniture, curtains, and belongings from the work area
- Cover floors and vents to prevent dust spread
- Tape shut cabinets or seal off adjacent rooms
- Notify neighbors if the work might affect shared spaces (e.g., in apartment buildings or townhomes)
Good prep ensures quicker cleanup and reduces the chance of cross-contamination.
Step 4: Communicate Early and Often
Before abatement starts, ask your contractor:
- What exactly will be removed or sealed?
- How will lead dust removal be handled?
- What are the timelines for each phase of the project?
- When can your family safely return?
Having these answers in advance gives you peace of mind and sets clear expectations.
Getting ready for lead abatement doesn’t have to be overwhelming. With the right team and a little planning, you can minimize disruption and maximize results.
In the next section, we’ll take you inside the actual process—so you know exactly what to expect from day one to final clearance.
The Step-by-Step Lead Abatement Process
What actually happens during a lead abatement project? If you’re imagining a chaotic mess of hazmat suits and plastic tarps, you’re not far off—but there’s much more structure and strategy involved. Understanding each phase of the step-by-step lead abatement process will help you feel informed, confident, and in control.
Let’s break it down clearly, so you know exactly what to expect.
1. Lead Inspection and Risk Assessment
Before anything is removed, a certified professional will perform a detailed lead inspection and abatement assessment. This includes:
- Testing painted surfaces, soil, and dust
- Pinpointing areas where lead-based paint is deteriorating or at risk
- Creating a site-specific lead abatement plan tailored to your property
This isn’t guesswork—it’s a science-backed approach that sets the foundation for safe and effective work.
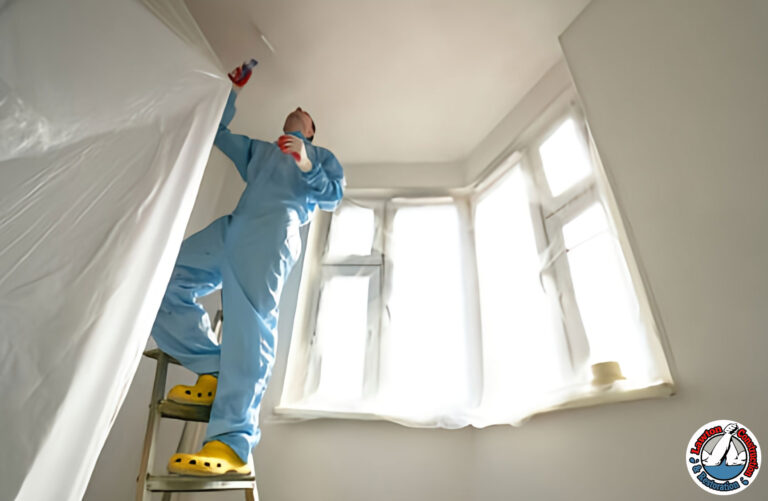
2. Site Preparation and Containment
Containment is key. Professionals will seal off the affected areas using:
- Heavy-duty plastic sheeting
- Negative air machines to filter lead dust
- Warning signs to keep people (and pets) out
This stage ensures lead paint containment so dust and debris don’t travel to other parts of your home or outside.
3. Removal or Stabilization of Lead Hazards
Now the real work begins. Depending on your abatement plan, the contractor may:
- Completely remove lead-based paint using chemical strippers or heat systems
- Use lead paint encapsulation to seal contaminated surfaces
- Replace contaminated materials—like windows, doors, or trim—with new, safe components
- Apply methods of lead paint stabilization where full removal isn’t necessary
Every choice is made to meet EPA lead abatement regulations while minimizing disruption.
4. Post-Abatement Cleaning
After all work is completed, the space undergoes intensive cleaning to eliminate any remaining particles. This includes:
- HEPA vacuuming of all surfaces
- Wet-washing walls, floors, and windows
- Final visual inspections to confirm no visible dust or debris remains
This isn’t optional—lead dust removal is required to pass clearance.
5. Clearance Testing and Documentation
The final phase ensures your home is officially lead-safe. A certified professional conducts:
- Clearance testing using lab-verified dust wipe samples
- A written report confirming your home has passed all safety benchmarks
- Documentation you’ll need if you ever sell, rent, or renovate
This paperwork isn’t just a formality—it’s your proof of compliance with lead abatement regulations and peace of mind that the hazard has been handled correctly.
From the outside, lead abatement may seem intimidating. But with trained professionals and a clear process, it becomes a manageable project that delivers lasting safety.
Next up, we’ll cover how to keep your home lead-safe for the long haul—because prevention doesn’t stop after the job is done.
Maintaining a Lead-Safe Home After Abatement
You’ve made it through lead abatement—congratulations! But here’s the truth many homeowners don’t hear: the job isn’t done just because the professionals have packed up their gear. Maintaining a lead-safe home is an ongoing commitment, especially in older properties where lead may still exist in hidden areas.
The good news? With a few simple habits and proactive steps, you can minimize future risks and keep your space safe for everyone who lives there.

Why Ongoing Maintenance Matters
Even after professional lead abatement, wear and tear on your home can expose remaining lead-painted surfaces or stir up residual lead dust. That’s why staying vigilant is key—especially if you have young children, whose developing bodies are most vulnerable to lead exposure.
Daily and Weekly Lead-Safe Practices
Incorporating lead-safe habits into your regular cleaning routine is one of the most effective ways to maintain a healthy home. Here’s what that looks like:
- Wet-clean floors and window sills regularly with disposable wipes or damp cloths—avoid dry sweeping or dusting
- Use HEPA-filter vacuums instead of standard ones to capture fine dust particles
- Remove shoes at the door to avoid tracking in outdoor soil, a common source of lead
- Wash hands frequently—especially before eating or after playing on the floor
These simple habits go a long way in reducing residual lead dust, a common hidden danger in both homes and rental properties.
Regular Inspections and Monitoring
Lead doesn’t disappear overnight. Especially in older homes, it can still be lurking beneath new paint or in less accessible areas. We recommend:
- Annual visual inspections of painted surfaces for chips, cracks, or wear
- Repainting worn areas with lead-safe materials before degradation occurs
- Scheduling periodic lead hazard assessments in high-risk zones
If you manage historic properties or apartment buildings, routine assessments aren’t just smart—they may be legally required under HUD lead abatement guidelines.
Stay Informed, Stay Compliant
Laws and safety standards evolve. Keep up with EPA lead abatement regulations and local ordinances to ensure your home (or rental property) remains compliant.
Also, if you plan any future renovations—even minor ones—make sure contractors are trained in lead-safe renovation practices. One poorly handled project could undo all your hard work.
When to Call a Professional Again
Sometimes, life throws surprises—flooding, accidental damage, or unexpected wear. If you notice:
- New peeling paint in an abated area
- Persistent dust buildup despite cleaning
- Children showing symptoms of lead exposure (irritability, fatigue, stomach issues)
…it’s time to call in a licensed lead abatement contractor to re-evaluate your space.
Maintaining a lead-safe home is not just a checklist—it’s an investment in long-term health and peace of mind. Think of it as the final, ongoing phase of your lead hazard reduction journey. You’ve already taken the hardest step—now, you’re empowered to keep your home safe for years to come.
Conclusion: Your Lead-Safe Home Starts with One Smart Decision
Now that you’ve walked through the full journey of lead abatement, how are you feeling—more confident, more informed, maybe even a bit empowered?

You should be. Understanding the risks of lead-based paint, knowing the difference between lead abatement and lead hazard reduction, and taking real steps toward making your home lead-safe aren’t just responsible—they’re transformative.
Because here’s the truth: protecting your home from lead hazards isn’t only about compliance with EPA lead abatement regulations or following HUD guidelines. It’s about protecting what matters most—your health, your family, and your future.
Whether you’re a homeowner in an aging property, a landlord managing rental properties, or someone planning to renovate a beloved old home, you have the power to create lasting change. And with the right lead abatement contractors, smart planning, and a commitment to lead-safe home practices, that change can happen sooner than you think.
So, what’s your next step?
- Will you schedule a lead inspection?
- Reach out to a certified lead abatement specialist?
- Or maybe just start by sharing this guide with someone who needs it?
Whatever you choose, know this: every action you take brings you one step closer to a home that’s not just beautiful—but safe, healthy, and resilient for years to come.
Because peace of mind? That starts with prevention. And you’re already on the right path.